
Form Renderers
When working with a CSS framework (like UIkit, Bootstrap or even TailwindCSS) forms usually have predefined classes to make them look nicer by default.
You could apply all these classes at runtime (see docs here), but it's a lot easier if you have a renderer that does that for you.
Using the UIkit Renderer
$form->setRockFormsRenderer("UIkit");Customising the UIkit Renderer
I'm using a UIkit + Tailwind combo for my frontends and it's easy to customize every aspect of your forms by using an existing renderer and modifying the wrapper templates. This can be done in the buildForm() method of your form:
public function buildForm()
{
$form = $this;
$form->setRockFormsRenderer('UIkit');
// add tailwind classes to the <form> element
$form->getElementPrototype()
->addClass('grid gap-2 pb-10');
// get the renderer and modify it to our liking
$renderer = $form->getRenderer();
// set markup for wrappers
// these are the error messages injected from backend validations
$error = "div class='$errorClass'";
$renderer->wrappers['error']['item'] = $error;
$renderer->wrappers['control']['errorcontainer'] = $error;
$renderer->wrappers['label']['container'] = 'div';
$renderer->wrappers['control']['container'] = 'div';
$renderer->wrappers['hidden']['container'] = 'div class="uk-hidden"';
// ...
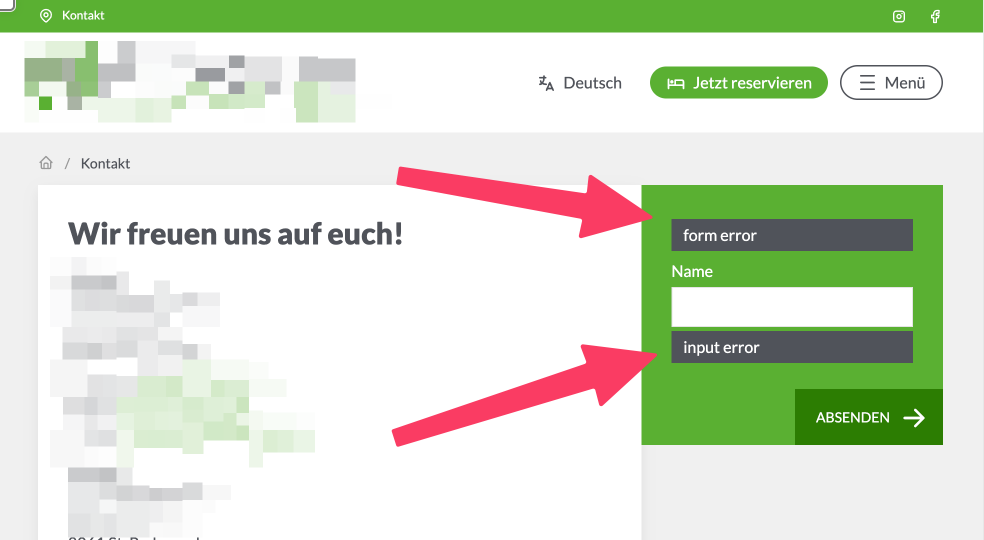
}For developing or debugging it is helpful to throw errors without the need to resubmit the form over and over again.
Throw an error on the form itself:
public function buildForm()
{
  $form = $this;
  // ...
  // throw an error on the form
  $form->addError('form error');

  // add field
  $form->addText('name', ...);

  // throw an error on a specific field
  $form->getControl('name')->addError('input error');

  // ...
}
DRY
If you have multiple forms you likely want to use the same settings for all your forms. Keep your code DRY and add a method like this to your Site.module.php:
// the form
public function buildForm()
{
  $form = $this;
  $form->setRockFormsRenderer('UIkit');
  site()->setupForm($form);
  // ...
}

// in Site.module.php
public function setupForm($form): void
{
  $form->getElementPrototype()
    ->addClass('grid gap-2 pb-10');

  $renderer = $form->getRenderer();
  // set options for live form validation
  $errorClass = 'block bg-secondary px-3 py-1 mt-1 text-sm';
  // set markup for wrappers
  $error = "div class='$errorClass'";
  $renderer->wrappers['error']['item'] = $error;
  $renderer->wrappers['control']['errorcontainer'] = $error;
  $renderer->wrappers['label']['container'] = 'div class="mb-1"';
}
Creating your own Renderer
You can very easily create your own renderers for your project. Simply place it in site/templates/RockForms/Renderer and RockForms will automatically load it for you once you use it. Here is a simple example to get you startet - please also see site/modules/RockForms/RockFormsRenderer/UIkit.php as inspiration!
<?php

namespace RockForms\Renderer;

use Nette\Forms\Controls\TextInput;
use Nette\Forms\Form;

class Demo extends RockFormsRenderer
{
  public function __construct()
  {
    parent::__construct();

    // see RockFormsRenderer for all other wrapper settings
    $this->wrappers['error']['item'] = 'div style="color: red"';
  }

  /**
   * Provides complete form rendering.
   * @param  string  $mode  'begin', 'errors', 'ownerrors', 'body', 'end' or empty to render all
   */
  public function render(Form $form, ?string $mode = null): string
  {
    foreach ($form->getControls() as $control) {
      if ($control instanceof TextInput) {
        $control->getControlPrototype()
          ->addClass('my-text-class');
      }
    }

    return parent::render($form, $mode);
  }
}
To use this renderer in your form do this:
class Contact extends RockForm
{

  public function buildForm()
  {
    $form = $this;
    $form->setRockFormsRenderer('Demo');
    // ...
  }
}